
- Comments Off on snow saabin’
- Tags [SAAB 99, SAAB 99 GL, seattle, snow, Wagonback]
- Categories [1977 SAAB 99 GL]
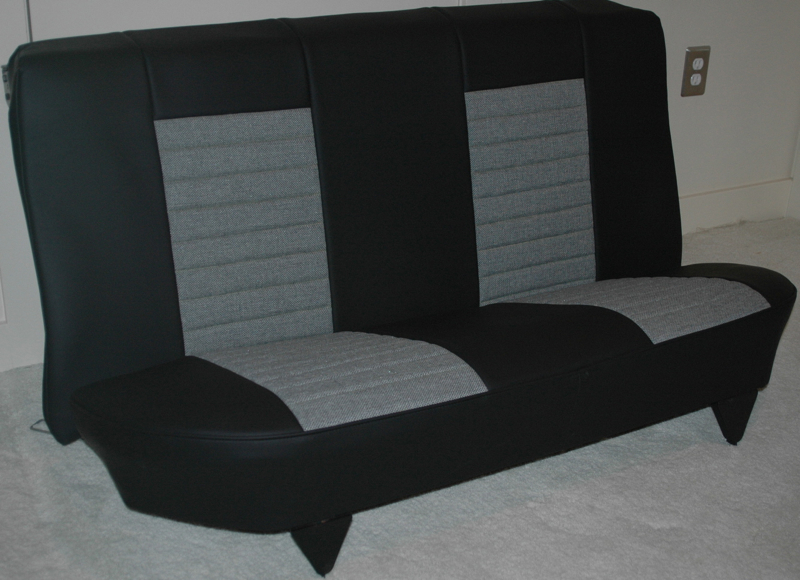
Last update for the year, and quite a bit of work has been done to the car. It’s going slow, but I’m hoping that it will be done by the Spring. I did post pictures of the seats at Mark’s Upholstery, but they were still in progress. Mark asked that I get a rebuild kits so that he could fix both the seats and the backs. Now they really are as good as new. He is also recovering the head rest inserts with the same black vinyl (rather than fabric).


Both the left front wing, left rear door and left rear quarter have been straightened as best they can. Now all the detail has been filled with a fiberglass compound and will be sanded and sanded smooth.


I visited a wrecking yard with a few late 60s, early 70s SAAB 99s .. back when the bumpers were chrome and lots of the trim was metal instead of plastic. The cool thing about 99s is a lot of parts are interchangeable throughout the years. I needed a new steering wheel and I ended up with a really nice EMS 3 spoke, but after I saw this steering wheel I sort of thought to go more in the classic direction than the sporty direction.

The wheel itself is hard plastic over a metal ring and in decent shape. There are some old style plastic wheel restoration kits, such as Eastwood’s, which allow you to repair cracks and pits. The horn piece is rubber over metal and the trim pieces are solid aluminum. I used Black Again on the rubber and 300 grit sand paper on the aluminum.


It was suggested that I spray the painted lamp clusters with a clear high gloss enamel to protect them. I also sealed the lamp lenses where they had cracked with an epoxy. I cleaned up the rubber with mineral spirits and then treated them with “Black Again” which made them look and feel good as new. I’ll replace the cage nuts with stainless steel ones and I’ve done that with the screws as well. Lets see how they hold up.
I picked up the rear seat today. The driver and passenger seat are still getting finished up with new seat and back trampolines. I think they really turned out great. The trunk fabric on the back of the back seat is what is going to be used on the floor panels and side panels of the trunk. There are a few ‘manila brown’ pieces which I plan to paint with a good enamel and cure in a low temp drying oven. The two side panels that fit over the wheel arches in the back seat area are getting painted at the body shop with a very durable paint.


When the car was in one piece, I would hear a loud rattle coming out the engine compartment while driving at highway speed. It didn’t sound like it was coming from the engine itself, but I wasn’t sure where it was coming from. Today I removed the radiator hanger/hood latch to get it painted and noticed that the upper left bracket of the radiator had broken off. I removed the radiator and also found that the right lower bracket had also broken. That means that the radiator was only being held in place by the overfill hose and the left lower bracket. I’m going to guess that this damaged occurred in the accident.

")
Fortunately there is a radiator shop next to the body shop, so I walked it over. The shop said that the breaks were clean enough that everything could be prepped (sandblasted and tinned) and welded back on. I was also told that this is a common occurrence with SAAB 99s and 900s.
The radiator and assembly is going to be painted black. The hoses are in good shape, but I’m going to replace the temperature sensor fan switch and the thermostat with lower threshold ones to improve cooling.
Before I found the old new stock turn signal, I got a pair of front turn signals that were complete, but were pretty weathered. I started searching on how to refurbish the reflective surface of the light cluster and found a couple of options. Unfortunately the only right way to do it is expensive and uses the same method of applying a thin metal film just as it was done during the manufacturing process. Some people suggest “chroming plastic” which is a little cheaper. Others suggest using two coats of Krylon high gloss black plastic paint as a base and then two coats of “brilliant” silver paint. So I tried that, and after letting the clusters air dry, I put them in a low temp drying oven for a few hours.
Before:

After Krylon High Gloss Black for plastic:
")
After Krylon Brilliant Metallic Silver paint:

I’m concerned at how well it will hold up, but we’ll see. It definitely is reflecting light better.
There is a definite list of Holy Grails for the SAAB 99. The front turn signals probably aren’t that rare for the 1977-1984 models since they’re newer and they were made for 7 years, but they seem impossible to find. I was piecing together a set when I came across a brand new one .. and just one. Both the left and right on the car were destroyed by the accident and weathering. What was left of them crumbled to the touch.


I probably will save the new one pictured above until I find another and for now make a pair out of these below. The clear lenses are from the earlier years, the later were European spec and later US models. One reason why these may be so rare is that they have issues with weatherproofing which causes moisture to get trapped. The build up of moisture, moss/mold can destroy the reflective mirroring enamel and ultimately make the plastic brittle. If you ever crack your lenses its important to take care of it as soon a possible. I’ve been researching how to restore them, its a common problem but its very expensive to get the mirroring restored.
It’s best not to obsess over this though.


Here is a start at the interior. Once the painting is done, I’ll get it finished up, but I wanted to at least get the seats redone first.
You remember this one:
")
I wanted to the new seats to be similar to the old sporty Sonnett buckets which looked like this:

This is how they turned out:


